
- TL;DR
- Why React Apps Need a Referral SDK
- What Cello's React SDK Does
- Prerequisites: What You Need Before You Start
- Step 1: Load the Cello Script in Your React Project
- Step 2: Initialize Cello and Pass Your User Context
- Step 3: Trigger the Referral Widget at the Right Moment
- Step 4: Test Your Integration and Verify Referral Attribution
- Add a Referral Program to Your React App Today
TL;DR
- Cello's referral component loads via a CDN <script type="module"> tag. No npm package is required.
- The full frontend integration (script load + cello.boot() call + cello.show() trigger) takes 3–4 hours for a React developer.
- The only backend requirement is a server-side JWT endpoint. Cello handles all reward logic, payout processing, and attribution tracking.
- Referral attribution uses a first-party ucc cookie that persists across browser sessions and devices.
- Cello is a Merchant of Record, your engineering team does not build or maintain a payout system.
Adding a referral program to a React application takes 3–4 hours of frontend work when you use Cello's SDK, not weeks of custom development. This guide covers every step: loading the CDN script, generating the server-side JWT, calling cello.boot(), and triggering cello.show() at peak intent. Full technical reference.
Why React Apps Need a Referral SDK
A referral program embedded inside your React app converts at a fundamentally higher rate than one hosted on a standalone landing page. When users see the referral prompt inside your product, at a high-intent moment, in the context of an experience they already value, sharing intent is at its peak. A third-party landing page breaks that context, introduces redirect friction, and typically achieves 3–5x lower conversion rates than in-product placements.
- Context drives conversion: referral prompts at post-signup or post-first-value moments outperform email-based campaigns: users are in a motivated state inside the product, not in an inbox.
- No redirect friction: Cello's referral widget opens as an overlay inside your React app. Users never leave your product to share a link or check their rewards balance.
- Attribution stays clean: the first-party ucc cookie captures the referral source at link click and persists across sessions and devices without requiring third-party cookies.
- Engineering scope stays minimal: Cello handles all reward logic, fraud detection, and automated payout processing. Your team integrates the SDK and writes one JWT endpoint.
What Cello's React SDK Does
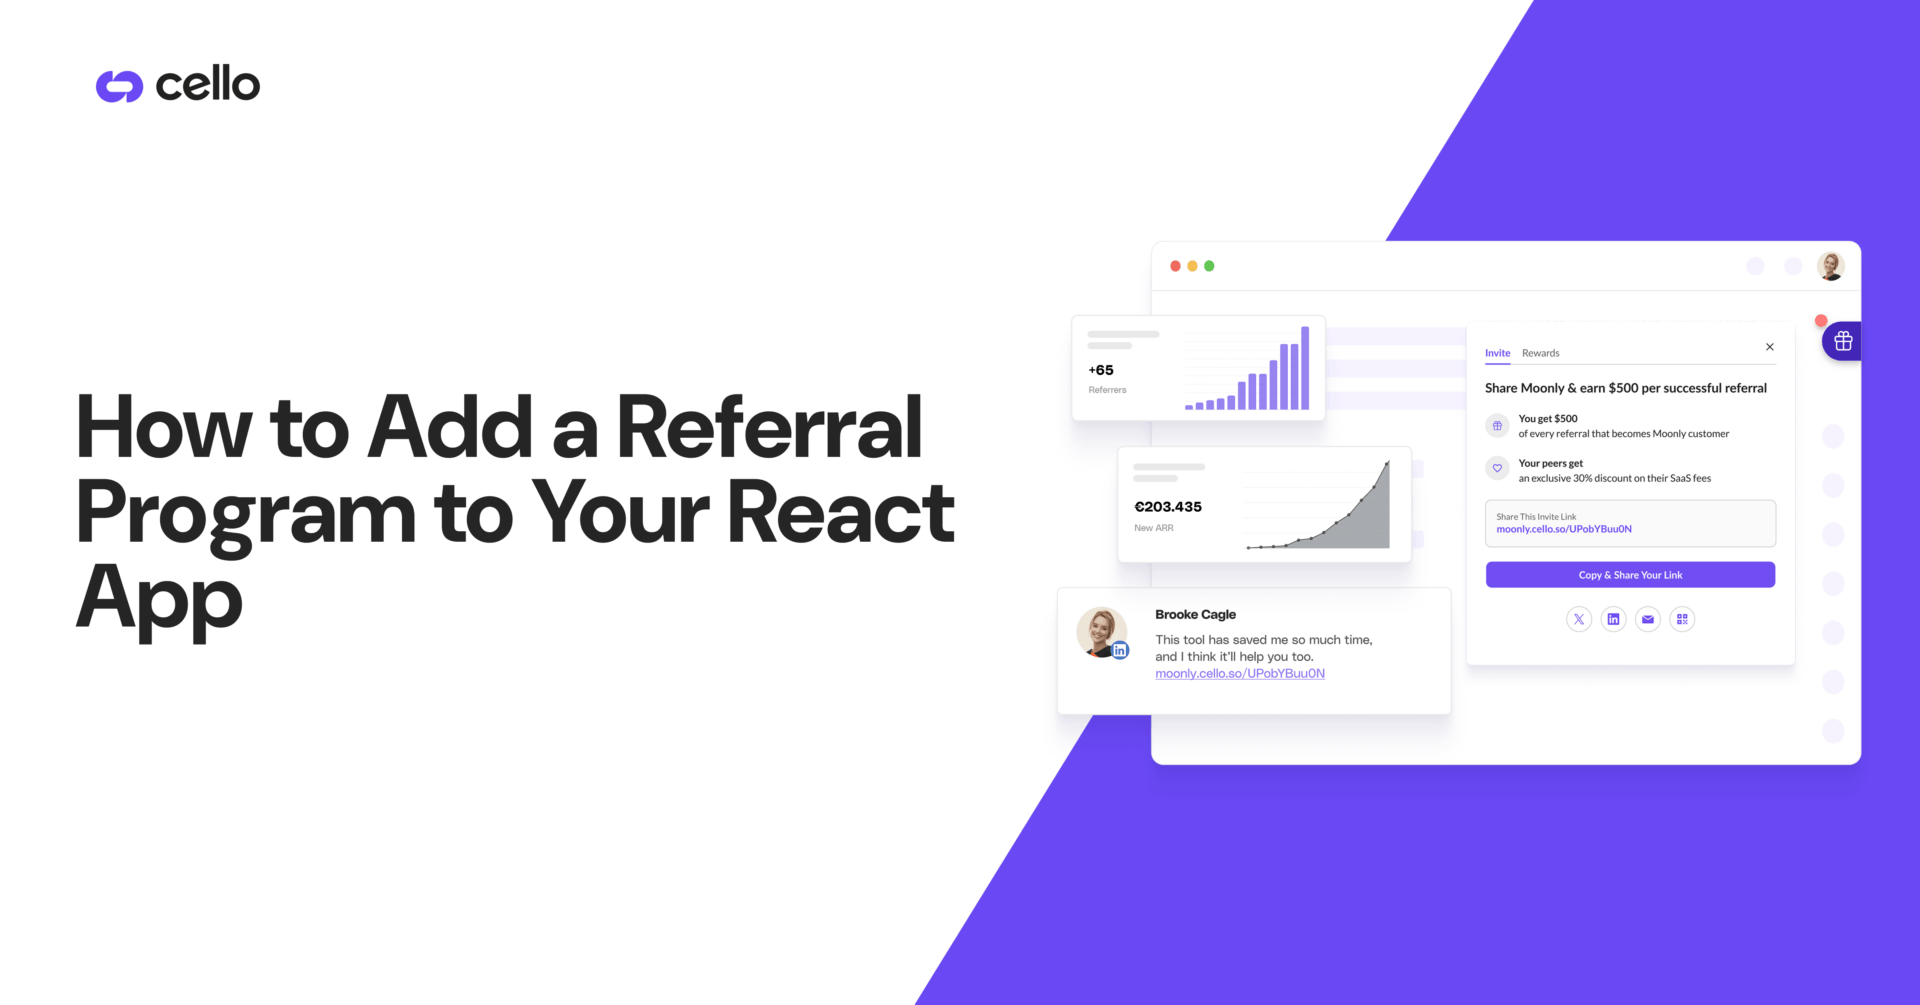
Cello's referral component is delivered as a CDN-loaded JavaScript module that mounts an in-product referral widget inside your existing React application. It does not require a separate npm package, a dedicated referral landing page, or a custom reward database. Your team loads one script tag and calls one initialization function.
What the SDK handles automatically:
- Renders the referral widget (invite flow, reward tracking dashboard, payout status) as an overlay inside your React app without a page reload.
- Tracks referral attribution via a first-party ucc cookie, persists across browser sessions and survives page refreshes.
- Manages reward eligibility rules, fraud detection, and compliance checks across all referral activity.
- Processes and disburses rewards as Merchant of Record. No payment engineering, tax handling, or payout infrastructure required from your team.
- Provides a full sandbox environment for end-to-end testing before going live.
What your team builds (one-time only):
- A server-side endpoint generating a signed JWT (productUserId + iat fields, HS512 algorithm) using your Cello signing secret.
- A trigger condition in your React code that calls cello.show() at the highest-intent moment in your user journey.
- Optional: a Stripe, Paddle, Recurly, or Chargebee webhook integration for automated purchase confirmation and reward fulfillment.
What you do not need to build:
- A referral tracking database, attribution system, or referral code generator.
- A payout system, currency conversion layer, tax documentation handler, or reward compliance infrastructure.
- A separate referral landing page, microsite, or dedicated referral domain.
The table below maps every integration responsibility so your team knows exactly what to scope before starting
| What Cello handles | What your team builds (once) | What you don't build |
|---|---|---|
| Referral widget rendering (overlay, invite flow, reward dashboard) | Server-side JWT endpoint (productUserId + iat, HS512) | Referral tracking database or attribution system |
| Referral attribution via first-party ucc cookie | cello.show() trigger at your chosen moment | Payout system, currency conversion, or tax documentation |
| Fraud detection and reward eligibility logic | Optional: billing webhook (Stripe, Paddle, Recurly, Chargebee) | Referral landing page or microsite |
| Payout processing, currency conversion, tax docs (W-9, W-8BEN) | — | Referral code generator |
| Sandbox environment for end-to-end testing | — | Ongoing reward infrastructure maintenance |
Now that you understand what the SDK handles (and what it doesn't), here's exactly what you need before writing your first line of code.
Prerequisites: What You Need Before You Start
You need four things before you start: a Cello account, your productId and signing secret from the Dashboard, a server-side JWT environment, and an authenticated React app with user session data. All four are available once you complete Cello's initial onboarding.
- A Cello account
- Your productId from the Cello Dashboard.
- Your Cello signing secret from the Dashboard (for server-side JWT generation, never expose this on the client side).
- A server-side environment (Node.js, Python, Ruby, Go, or any language supporting JWT HS512).
- React 16.8+: the recommended integration pattern requires hooks (useEffect).
- An authenticated user session with userId, firstName, lastName, and email available at the time of initialization.
Note: No npm package installation, database migration, or changes to your existing authentication system are required to start the integration.
Step 1: Load the Cello Script in Your React Project
The first step is adding Cello's CDN script tag to your application. There is no npm package to install. Use the sandbox URL during development and switch to the production URL before go-live. The script uses type="module" and loads without blocking your React render cycle.
Option A — Add directly to your public/index.html (Create React App / Vite):
Cello's referral component loads via a single <script type="module" async> tag added to your HTML <head>. No npm install required. Use the sandbox CDN URL during development and swap to the production URL before go-live. The script loads asynchronously and does not block your React render cycle.
Full script tag syntax and both CDN URLs: (Step 1: Load the script)
Option B — Load dynamically in a React component using useEffect:
If you need to conditionally load Cello. For example, only for paid users or after a feature gate resolves, load the script dynamically inside a React useEffect hook. Create a <script> element, set type="module" and async=true, append it to document.head, and return a cleanup function that removes it on unmount. This approach prevents duplicate script loads on re-renders.
Complete useEffect implementation: (Step 1: Load the script)
Option B is useful when you want to conditionally load Cello only for specific user tiers or after a feature gate check. If your application uses a Content Security Policy (CSP), add the following to your script-src directive:
If your application uses a Content Security Policy (CSP), you must allowlist Cello's CDN domains in your script-src directive. Without this, the browser will block the script before it loads, the widget will never initialize and no error will appear in the Cello Dashboard.
Exact CSP string to add: (Step 1, "Avoiding CORS Issues")
With the CDN script loading correctly, the next step is authenticating the current user. Generating a server-side JWT that Cello validates before the referral widget renders.
Step 2: Initialize Cello and Pass Your User Context
Step 2 requires two things: a server-side JWT endpoint that Cello validates before rendering the widget, and a single cello.boot() call inside a React useEffect hook that passes the token plus the authenticated user's identity. The entire backend step takes under 2 hours for a Node.js developer.
Initialization tells Cello which product the widget belongs to and which authenticated user is viewing it. This step requires a server-side JWT. Cello validates the token before rendering the widget, and Cello does not support client-side-only initialization.
Backend: Generate the user JWT (Node.js example)
Generate the user JWT server-side only, never in the browser. The token requires three fields: productUserId cast as a string (numbers will fail validation), iat as a Unix timestamp in seconds, and the signing algorithm set to HS512. Sign it with your CELLO_SIGNING_SECRET environment variable and expose it as an authenticated GET /api/cello-token endpoint.
Reference the table below before calling cello.boot(). Every JWT validation failure traces back to one of these four parameters.
| Parameter | Type | Required | What it does |
|---|---|---|---|
| productUserId | String (must be cast — numbers will fail validation) | Yes | Identifies the authenticated user to Cello — must match the userId in your user database |
| iat | Unix timestamp in seconds (Math.floor(Date.now() / 1000)) | Yes | Issued-at claim — Cello validates token freshness; tokens without iat are rejected |
| algorithm | HS512 (set in jwt.sign options, not in payload) | Yes | Cello only accepts HS512 — RS256 or HS256 will return error code 1100 |
| signing secret | Your Cello Dashboard secret (server-side only) | Yes | Never expose on the frontend — set as an environment variable (process.env.CELLO_SIGNING_SECRET) |
Error code 1100 in your browser console indicates a JWT validation failure. Check productUserId type, algorithm, and signing secret first.
Frontend: Initialize in a React component using useEffect
Call cello.boot() once per authenticated session, typically inside a useEffect in a root-level layout component. Pass your productId, the JWT token fetched from your server endpoint, the language code, and the user's firstName, lastName, fullName, and email. Re-initialize only when the user ID changes by setting [user.id] as the useEffect dependency array.
Complete cello.boot() configuration options and React implementation: (Step 3: Initialize the library)
Mount <CelloProvider user={currentUser} /> inside your authenticated layout. Once per session, after the user has logged in.
Debugging: Error Codes 1100 and 1200
- If you see error code 1100 in the browser console, the JWT has a validation issue. Check that productUserId is a string, the signing secret matches your Dashboard, and the algorithm is HS512.
- Error code 1200 indicates a product ID or environment mismatch (e.g., using a production productId with the sandbox CDN URL, or vice versa).
Both error codes appear in the browser DevTools console immediately after cello.boot() is called
| Error code | What it means | Most common cause | Fix |
|---|---|---|---|
| 1100 | JWT validation failed — Cello rejected the token before booting | productUserId passed as a number instead of a string, or wrong signing algorithm (not HS512) | Cast productUserId to String() in your JWT endpoint; confirm algorithm: 'HS512' in jwt.sign options; verify signing secret matches Dashboard value exactly |
| 1200 | Product ID or environment mismatch — SDK cannot match the token to a product | Using a production productId with the sandbox CDN URL, or vice versa | Match CDN URL to environment: sandbox CDN (assets.sandbox.cello.so) must use sandbox productId; production CDN (assets.cello.so) must use production productId |
📱 React Native: Use Cello’s dedicated React Native SDK at docs.cello.so. Do not load the Web CDN script or use the window.cello.cmd pattern in a React Native environment.
With cello.boot() initialized and the JWT validated, the last frontend decision is where to call cello.show(). The placement choice that has the biggest impact on your referral conversion rate.
Step 3: Trigger the Referral Widget at the Right Moment
Where you trigger the referral widget matters more than almost anything else in this integration. A settings page buried three levels deep kills conversion. A post-signup or post-first-value prompt at peak intent drives it. cello.show() opens the referral overlay; cello.hide() closes it. Both are available only after cello.boot() completes successfully.
cello.show() opens the referral overlay; cello.hide() closes it programmatically. Both methods return Promises, always await them. Both are only available after cello.boot() has completed successfully. Use cello.show() in onClick handlers, route transitions, or post-event callbacks. To suppress the default floating button and control visibility entirely through cello.show(), set hideDefaultLauncher: true in your cello.boot() configuration.
Four optimal trigger moments for SaaS products:
- Post-signup celebration screen: immediately after account creation, when motivation to share is highest; frame it as "invite a colleague and both of you get [reward]".
- Post-first-value moment: once the user completes their first meaningful product action (first report created, first meeting recorded), sharing intent peaks; this is when the product has proven its value.
- Post-upgrade confirmation: users who just completed payment are the highest-satisfaction segment; a referral prompt immediately after the upgrade confirmation screen consistently produces the highest sharing rates.
- Persistent dashboard entry point: add a "Refer a friend" button or menu item that calls cello.show() directly, so motivated users can share at any time without waiting for a trigger.
URL parameter shortcut: Deep-link directly to specific widget views by appending URL parameters to any page in your app. This is useful for driving referral activity from email campaigns and onboarding checklists without requiring users to navigate to a specific screen.
- ?cello-open=invite (invite flow)
- ?cello-open=rewards (rewards overview)
- ?cello-open=edit-payments (payout settings)
Choose your trigger moment based on where motivation peaks in your specific user journey.
| Trigger moment | User state at this moment | Why it converts | Best for |
|---|---|---|---|
| Post-signup celebration screen | User just created their account — motivation and excitement are at peak | Sharing intent is highest before the product has asked anything of the user | Freemium and free-trial products with viral growth potential |
| Post-first-value moment | User completed their first meaningful action (first report, first recording, first export) | Product has now proven its value — user has a specific result to reference when inviting others | PLG products where the "aha moment" is clearly defined |
| Post-upgrade confirmation | User just completed payment — highest-satisfaction segment in the entire user base | Cognitive dissonance drives advocacy: paid users justify their decision by recruiting peers | Freemium-to-paid products and usage-based SaaS |
| Persistent dashboard entry point | User is in a motivated state and actively exploring the product | Low-friction always-on access for users who want to refer without waiting for a trigger | All product types — minimum viable placement if no other trigger is implemented |
With the trigger configured, the final step before going live is verifying that every layer of the flow works correctly, JWT, attribution, and billing, against Cello's sandbox environment.
Step 4: Test Your Integration and Verify Referral Attribution
Before promoting your integration to production, verify that every layer of the flow works: the script loads without errors, the widget initializes, the integration generates and captures referral codes at signup, and attribution flows correctly to your billing system. Run all tests against Cello's sandbox environment to avoid affecting live data.
- Widget renders correctly: log in as a test user, confirm cello.show() opens the referral widget with the invite flow, reward views, and payout status rendering without browser console errors.
- JWT validation passes: open browser DevTools (Network tab), confirm cello.boot() returns a successful response with no 1100 (JWT validation error) or 1200 (tenant/environment mismatch) codes in the console.
- Referral link captures the ucc parameter: copy a referral link from the widget, open it in a new browser session (or incognito), and confirm the ucc parameter appears in the URL and is stored as a first-party cookie.
- Signup attribution is recorded: create a test account using the referral link, then verify in the Cello Dashboard that the new user is attributed to the correct referrer.
- Purchase attribution flows to billing: if you have Stripe, Paddle, Recurly, or Chargebee integrated, trigger a test conversion and confirm the referral reward is queued correctly in the Cello Dashboard.
Attribution mechanics: Cello stores the ucc referral code as a first-party cookie at the moment a user clicks a referral link. Cello preserves attribution across sessions on the same browser.
If a user switches to a different device entirely, they need to click the referral link on the new device. The attribution window and logic are configurable in the Cello Dashboard for teams with longer sales cycles.
Merchant of Record, what happens after attribution: Once a referred user converts to a paid account, Cello handles the complete reward lifecycle: reward calculation, payout issuance, currency conversion, tax documentation (W-9, W-8BEN), and compliance. Your engineering team has zero ongoing maintenance responsibility for the reward system after the initial integration is live.
Add a Referral Program to Your React App Today
Your React app is already the right place to embed a referral program. The integration is one <script> tag, one server-side JWT endpoint, and one cello.show() call.
- The full integration: CDN script, JWT endpoint, and cello.show() trigger, takes under 4 hours of developer time.
- Cello handles all reward processing, payout logic, and tax compliance as Merchant of Record. Your team has zero ongoing maintenance responsibility after go-live.
- Trigger placement is the highest-impact decision: post-signup and post-first-value moments consistently produce the highest referral conversion rates across Cello's customer base.
Frequently Asked Questions
How long does it take to integrate Cello's SDK into a React app?
The frontend integration, loading the CDN script, calling cello.boot() with user context, and triggering cello.show(), takes 3–4 hours for a React developer. Adding the server-side JWT endpoint takes an additional 1–2 hours. Full end-to-end testing, including signup attribution and billing integration (Stripe, Paddle, or Recurly), typically takes one additional working day.
Does Cello's SDK work with React Native as well as React Web?
Cello provides separate SDKs for React Web (CDN-based) and React Native (mobile). The Web SDK described in this guide loads via a script type module tag and uses the window.cello.cmd initialization pattern. The React Native SDK uses a platform-specific mounting method and is documented separately at docs.cello.so. Do not load the Web CDN script inside a React Native application, use the dedicated mobile SDK instead.
What backend work is required to add Cello's referral program to a SaaS product?
The required backend work is a single server-side endpoint that generates a JWT. If you want Cello to automatically trigger rewards on purchase conversion, connect your billing system (Stripe, Paddle, Recurly, or Chargebee) via webhook. Cello provides the webhook endpoint URL and configuration guide directly in the Dashboard.
How does Cello handle referral payouts, does our engineering team need to build a payout system?
No. Cello operates as a Merchant of Record, which means Cello processes all reward payouts, handles currency conversion, manages tax documentation, and maintains compliance. Your engineering team does not build or maintain any part of the payout infrastructure. This is one of Cello's primary differentiators from open-source referral frameworks that require you to build the full payout layer yourself.
Does Cello's SDK support single-page applications (SPAs) built with React Router?
Yes. Cello's referral component is designed for SPAs. The cello.boot() call is made once per authenticated session, typically in a root-level layout component, and the widget persists across React Router navigation without requiring re-initialization on route changes.
Best Referral Software: HubSpot & Stripe Integration (2026)
TL;DR What is a ‘native integration’? A native integration means the referral ...

1st-Level Visibility: The Setup That Makes Referral Programs Work
TL;DR You have a referral program. Your users have never thought about it. This is the most ...
Best Referral Platforms with Intercom Integration for In-App Triggers (2026)
TL;DR Triggering a referral invite at the right moment is the difference between a referral ...