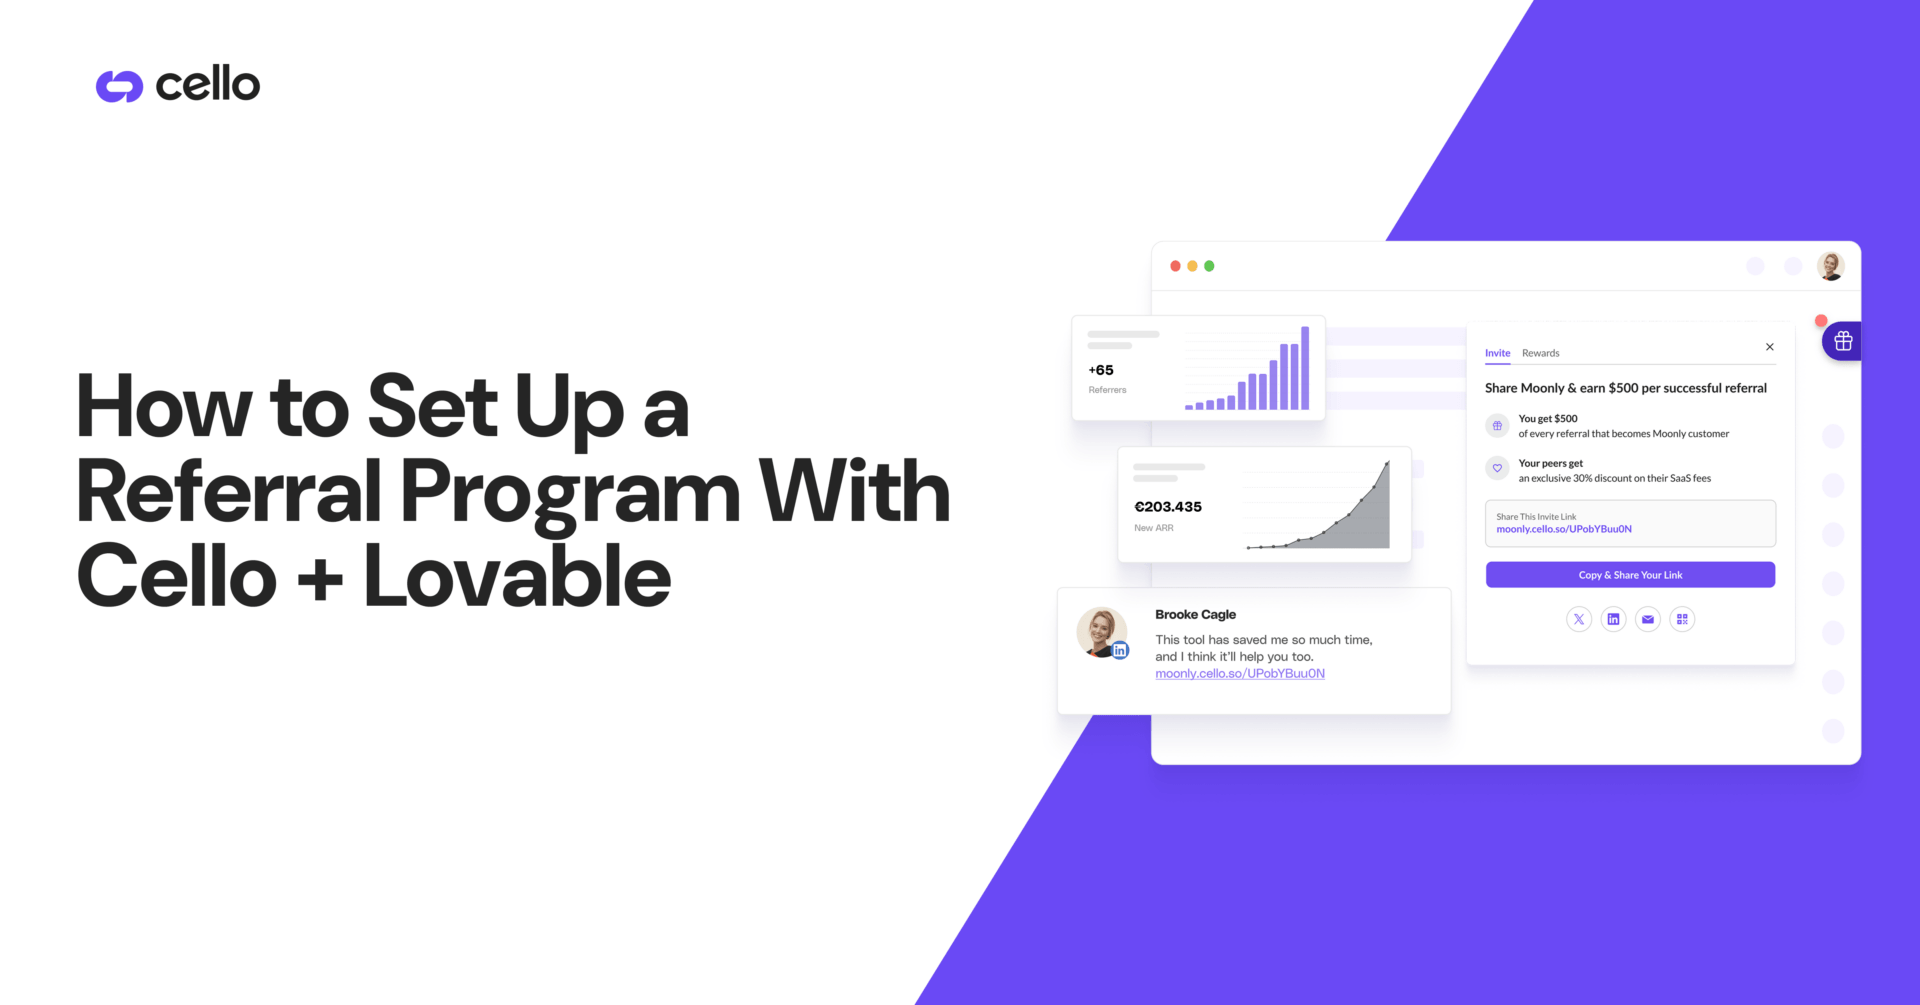

- How to Set Up a Referral Program in 48 Hours (Without Engineering)
- How Long Does It Take to Set Up a Referral Program?
- What You Need to Set Up a Referral Program With Cello + Lovable
- Step 1: Create Your Cello Account and Generate Your API Keys
- Step 2: Add the Cello Webhook Endpoint to Stripe
- Step 3: Prompt Lovable to Build the Cello Referral Integration
- Step 4: Review and Confirm the Four-Component Implementation Plan
- Step 5: Publish Your App and Test the Full Referral Flow
- How to Demo This to Stakeholders in 10 Minutes
How to Set Up a Referral Program in 48 Hours (Without Engineering)
The fastest way to set up a referral program in 2026 is to combine Cello's AI-powered referral infrastructure with Lovable's AI app builder, completing a fully functional integration in under 48 hours, without a single engineering ticket. Most Growth Managers spend weeks negotiating dev bandwidth before a referral program ever reaches staging. The Cello + Lovable integration changes that equation: you configure Cello, set up a Stripe webhook, and prompt Lovable's AI to implement four technical components in a single conversation.
This guide gives you the exact steps to replicate that result. For broader context, see the Complete Guide to Referral Marketing for B2B SaaS.
How Long Does It Take to Set Up a Referral Program?
- Prerequisites: Confirm Supabase + Stripe + Cello account are ready → Pre-existing / up to 30 min
- Step 1: Create Cello account + retrieve API keys → 10 min
- Step 2: Add Cello webhook endpoint to Stripe Dashboard → 10 min
- Step 3: Prompt Lovable to generate the integration plan → 15 min
- Step 4: Review + confirm the four-component plan → 10 min
- Step 5: Publish app + test full referral flow → 20 min
- Total active work: ~65 minutes
What You Need to Set Up a Referral Program With Cello + Lovable
Before you prompt Lovable (lovable.dev) to add referrals, three prerequisites must be in place. The Cello + Lovable integration relies on Supabase for user identity, Stripe for billing event tracking, and Cello as the referral engine. All three need to be functional before you start. If any of the three is missing, complete it first; the referral layer itself takes approximately 65 minutes to add on top of a working app.
- ✅ Supabase is connected to your Lovable project and user authentication is fully functional: users can sign up, log in, and are stored in Supabase.
- ✅ Stripe subscription flow is live: users in your app can subscribe and are associated with a Stripe customer ID.
- ✅ Cello account exists: sign up at cello.so; your API keys are accessible in the Cello Portal.
Optional, Recommended: Enable the Cello MCP Server
The Cello MCP (Model Context Protocol) server gives Lovable real-time access to Cello's documentation and integration health checks. Enabling it reduces implementation errors and allows post-launch debugging through natural-language prompts.
- Log into the Cello Portal → Access Keys.
- Click Generate MCP Access Token and copy the token.
- In Lovable's MCP settings, add, Cello's Server URL | Authentication: your MCP Access Token
- Note: Cello MCP is currently in Early Access. To request access, contact the Cello team at cello.so or email your account manager. Generate your MCP Access Token in the Cello Portal under Access Keys once access is confirmed.
Step 1: Create Your Cello Account and Generate Your API Keys
To set up a referral program with Cello and Lovable, start by creating a Cello account, navigating to the Cello Portal, and retrieving three values: your API key, your Webhook endpoint URL, and, if you are using Cello MCP, your MCP Access Token. All three values will be referenced in subsequent steps of this guide.
- Go to book a demo and create your account.
- Once inside, navigate to Cello Portal → Access Keys.
- Copy your API key → you will need this in Step 3 when Lovable builds the integration.
- Navigate to Cello Portal → Integrations → Webhooks and copy the endpoint URL you will need in Step 2.
- (Optional, MCP users only) Click Generate MCP Access Token and keep it ready for your Lovable MCP configuration.
Sandbox mode: Your Cello account starts in sandbox mode by default. This is the correct environment for prototyping and stakeholder demos. It allows you to simulate the full referral flow without triggering live payouts. Switch to production mode after stakeholder approval.
✅ SUCCESS SIGNAL (Step 1): After completing Step 1, you should have three values saved somewhere accessible: (1) your API key from Cello Portal → Access Keys, (2) your Webhook endpoint URL from Cello Portal → Integrations → Webhooks, and (3) optionally your MCP Access Token. If you can see all three values, you are ready to proceed to Step 2.
⚠️ FAILURE SIGNAL (Step 1): If the Cello Portal shows a blank Access Keys screen or no Webhooks endpoint URL is visible, your account setup may be incomplete. Confirm your account email is verified and that you are logged into the correct Cello workspace. Contact Cello support at cello.so before proceeding to Step 2.
Step 2: Add the Cello Webhook Endpoint to Stripe
The Cello + Lovable integration tracks referral conversions through Stripe billing events. To connect them, add Cello's webhook endpoint URL to your Stripe Dashboard and configure it to listen to all ten required events. This tells Cello when a referral converts, from subscription creation through renewal and cancellation.
- In the Cello Portal, go to Integrations → Webhooks and copy the Cello webhook endpoint URL.
- Open your Stripe Dashboard → navigate to Developers → Webhooks.
- Click Add endpoint and paste the Cello webhook endpoint URL.
- Under Events to listen to, select all ten required events (see list below).
- charge.refunded | charge.succeeded | charge.updated
- customer.created | customer.deleted | customer.updated
- customer.subscription.created | customer.subscription.deleted | customer.subscription.updated
- invoice.paid
- Save the endpoint.
- Stripe generates a Webhook Signing Secret upon saving. Store it securely; Lovable may reference it when configuring the webhook handler.
⚠️ All ten events are required. Missing any single event causes gaps in Cello’s conversion attribution, which prevents rewards from triggering and payouts from processing correctly.
✅ SUCCESS SIGNAL (Step 2): After saving, Stripe displays a green ‘Webhook endpoint added’ confirmation and your endpoint URL appears in the Webhooks list with a status indicator. All ten events appear in the ‘Events to send’ column. If you see all ten events listed and the endpoint status is active, you are ready to proceed to Step 3.
⚠️ FAILURE SIGNAL + SELF-CORRECTION (Step 2): If an event is missing from the endpoint after saving: return to Stripe Dashboard → Developers → Webhooks → click the endpoint → Edit → add the missing event(s) → Save. Do not proceed to Step 3 until all ten events show as active. If the endpoint URL is rejected, confirm you copied the correct URL from Cello Portal → Integrations → Webhooks (not the API key field).
For a full reference on Stripe webhook event types and endpoint registration, see the Stripe Webhooks documentation.
Step 3: Prompt Lovable to Build the Cello Referral Integration
Once the Stripe webhook is live, open Lovable in Plan mode and enter the Cello integration prompt. A single prompt, with or without MCP, triggers Lovable to read Cello's documentation, assess your existing codebase, and generate a complete four-component implementation plan before touching a single line of code.
- Open your Lovable project.
- Switch to Plan mode in the top navigation bar (do not use Build mode for this step).
- Enter one of the following prompts based on your setup (see below).
Standard prompt (MCP NOT enabled):
I want to add user referrals to my app using Cello.
MCP prompt (MCP IS enabled, recommended):
I want to add user referrals to my app using Cello. Use the Cello MCP to search the integration documentation, check my current integration status, and create a thorough implementation plan. Follow all best-practice recommendations from Cello.
- Lovable processes the prompt and returns a full implementation plan, this typically takes 30-90 seconds.
- Do not click Execute or Confirm yet. Review the plan against the four-component checklist in Step 4 before proceeding.
The MCP prompt gives Lovable real-time access to Cello's documentation and checks your existing integration status before planning. This catches configuration issues before they become runtime errors. Use the standard prompt only if MCP setup is not yet complete.
✅ SUCCESS SIGNAL (Step 3): Within 60–90 seconds, Lovable displays a structured plan explicitly referencing Cello SDK initialization, referral widget placement, attribution logic, and a Stripe webhook handler. No code has been executed yet. This is the plan only. If you can identify all four components in the plan text, you are ready to proceed to Step 4.
⚠️ FAILURE SIGNAL + SELF-CORRECTION (Step 3): If Lovable generates a generic plan that does not mention Cello or does not include all four components: (1) Re-run using the MCP prompt if you have not already done so. (2) If MCP is not available, prepend your prompt with: ‘My app uses Cello for referral tracking. Read the Cello integration documentation at docs.cello.so before creating a plan.’ (3) Confirm you are in Plan mode, not Build mode. Build mode executes immediately without showing you the plan first. Do not click Execute until you see all four Cello components in the plan output.
Step 4: Review and Confirm the Four-Component Implementation Plan
Before executing Lovable's implementation plan, verify it explicitly covers all four required components of a complete Cello integration: JavaScript SDK initialization, referral widget or UI placement, attribution setup for tracking referral conversions, and a Stripe webhook handler. Any plan missing one or more components will produce an incomplete integration that fails silently during live testing.
Check all four components are present in Lovable's plan before clicking Execute:
- ✅ Cello JS SDK initialization: SDK is loaded and initialized with your Cello API key on application load. Without this, Cello does not run in your app and no referral data is captured.
- ✅ Referral widget / UI placement: A referral component is added to at least one user-facing screen (dashboard, settings, post-signup). Users need a visible, accessible way to generate and share their referral link.
- ✅ Attribution setup: Referral source tracking is added to the signup or login flow. This records which existing user referred each new signup — the foundation of reward attribution.
- ✅ Stripe webhook handler: A server-side handler receives the Stripe webhook events and forwards them to Cello. This is how Cello registers conversions, calculates rewards, and triggers payouts.
- Read through Lovable's full implementation plan and confirm each of the four components appears.
- If a component is missing, type in Plan mode: 'Your plan is missing [component name]. Please add this component before we proceed.'
- Once all four components are present, click Confirm or Execute.
- Lovable implements the full integration in a single session: execution time varies by codebase size. Do not navigate away from the Lovable editor until it confirms completion.
- Once complete, you are ready to test in Step 5.
Step 5: Publish Your App and Test the Full Referral Flow
After Lovable finishes implementation, publish your app and verify the complete referral loop: generate a referral link, sign up via that link with a test account, simulate a Stripe subscription event, and confirm the reward triggers in the Cello Portal. A successful end-to-end test confirms your referral program is production-ready.
- Click Publish in Lovable's toolbar: your updated app is live within 30-60 seconds.
- Log in to your live app as User A (your existing test account).
- Navigate to the area where the referral widget is placed and copy your referral link.
- Open a new private/incognito browser window and sign up via the referral link as User B.
- Simulate a subscription event: in the Stripe Dashboard, create a test subscription for User B's customer ID.
- Return to the Cello Portal → Referrals dashboard. Confirm: User A appears as the referrer | User B appears as the referred user | The conversion is recorded | The reward status is 'Pending' or 'Approved'.
If the reward does not trigger, check: (1) all ten Stripe webhook events are selected and the endpoint is active; (2) the Webhook Signing Secret is correctly stored in Lovable's environment variables; (3) the Cello JS SDK is initializing on application load (check browser console for Cello initialization logs).
Post-launch prompts for Lovable (use in Build mode after testing): ‘Show me the Cello integration status using the MCP’ | ‘Debug why the referral conversion is not being tracked’ | ‘Add the referral widget to the post-signup confirmation screen’ | ‘Style the referral widget to match our brand colours’
How to Demo This to Stakeholders in 10 Minutes
A live referral flow in sandbox mode is the fastest way to get stakeholder buy-in for a broader rollout. The demo requires no additional setup. Everything built in Steps 1-5 is already in sandbox mode by default, which is sufficient to show the complete referral experience without triggering live payouts.
- Open your published Lovable app and navigate to the referral widget.
- Copy the referral link and share it in the meeting chat or screen-share the widget.
- Use a second browser session to simulate a new signup via the referral link.
- Switch to the Cello Portal dashboard and show the referral tracked in real time.
- Anchor the business case in data: use the Cello ROI Calculator to model CAC reduction, and reference two live benchmarks. VEED's 90.4% reduction in CAC vs. paid acquisition channels and tl;dv's 30.3% freemium-to-paid conversion rate (as of 2025).
- Close with the tl;dv benchmark: implementation in less than a day, 1,000+ monthly referral signups, 30.3% freemium-to-paid conversion rate (as of 2025).
Common stakeholder objection: 'What happens when we need to customise the reward structure?' Answer: Reward structure, payout amounts, eligibility rules, and reward types (cash, credits, discounts) are all configured in the Cello Portal dashboard. No code changes needed. Lovable can also implement custom reward display logic if you want UI-level customisation.
Frequently Asked Questions
Does Cello work with Lovable apps that use non-Supabase authentication?
Cello's JS SDK requires user identity data to attribute referrals. The Cello + Lovable integration is optimised for Supabase, which is Lovable's default authentication layer. If your app uses a different auth provider, Cello can still work, but the integration plan Lovable generates will differ. Provide the auth provider name in your Step 3 prompt so Lovable can account for it.
What happens if Lovable misses one of the four components?
Missing components cause specific failures: no SDK initialization means zero referral data is captured; no widget placement means users cannot generate referral links; no attribution setup means conversions cannot be linked to referrers; no webhook handler means rewards never trigger. Always complete the four-component checklist in Step 4 before executing Lovable's plan.
Is the Cello MCP server required to use the Cello + Lovable integration?
No. The MCP server is optional but strongly recommended. Without MCP, Lovable generates the integration plan using its general knowledge of Cello's documentation. With MCP enabled, Lovable retrieves live documentation and checks your integration health before planning, which reduces errors and speeds up the implementation.
Can this guide be used for apps built with Cursor or Replit instead of Lovable?
Yes. The Stripe webhook configuration in Step 2 and the four-component checklist in Step 4 apply regardless of your AI builder. The prompt structure in Step 3 adapts to the specific assistant interface
How long does it take for a referral conversion to appear in the Cello Portal?
In sandbox mode, conversions appear in the Cello Portal immediately after the simulated Stripe event is processed, typically within seconds. In production, the latency depends on Stripe's webhook delivery speed, which is usually under five seconds for standard subscriptions.
What reward structures does Cello support?
Cello supports cash rewards, account credits, discount codes, and custom reward types. Reward amounts, eligibility rules, and payout triggers are all configured in the Cello Portal without code changes. The referral widget updates automatically to reflect the current reward offer.
Do referred users need to complete a specific action for the reward to trigger?
Yes. The reward trigger is configured in the Cello Portal and is typically set to a paid subscription event, the invoice.paid Stripe webhook event. This ensures that rewards only pay out for genuine conversions, not free signups.
Can I use Cello without Stripe as the billing provider?
Cello supports multiple billing integrations beyond Stripe, including Chargebee, Recurly, and custom webhook setups. However, the Cello + Lovable integration documented in this guide is optimised for Stripe. For non-Stripe billing, consult Cello's integration documentation or contact the Cello team.
Integrations
Future-proof your organization with enterprise-grade security and compliance, sophisticated ...
1st-Level Visibility: The Setup That Makes Referral Programs Work
TL;DR You have a referral program. Your users have never thought about it. This is the most ...
Best Referral Software: HubSpot & Stripe Integration (2026)
TL;DR What is a ‘native integration’? A native integration means the referral ...